(NOTE: If you're still using Godot 3.x, check out the legacy Godot 3 version of this tutorial!)
Godot 4.0 stable is releasing with built-in support for WebXR, allowing developers to easily create AR and VR experiences that run on the web.
Why would you want to use Godot to do this rather than a JavaScript engine?
Well, Godot 4.0 also has built-in support for OpenXR (as well as plugins for other XR APIs), allowing you to create one Godot project that supports both running natively on your desktop or standalone headset (like Quest 2), as well as running on the web with WebXR.
And you get access to all the usual Godot tools (including the wonderful XR Tools addon) which are known for making game development a breeze. :-)
Read on to learn how you can get started with WebXR and Godot 4!
What is WebXR and why should you care?
WebXR is an open standard for allowing web applications to work with virtual reality (VR) or augmented reality (AR) hardware.
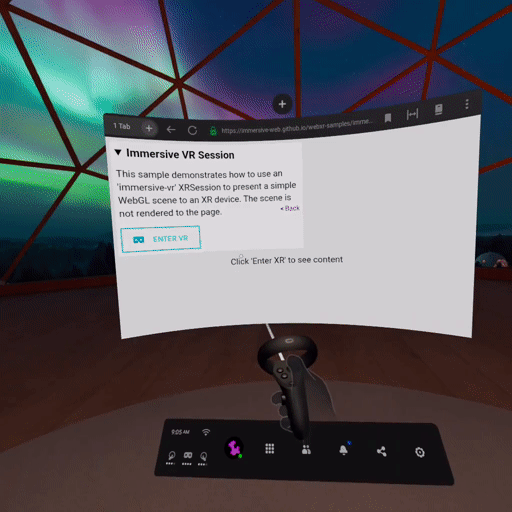
This means you can visit a web page, click an "Enter VR" button, and then put on your VR headset to play a game, without having to download or install anything. And the Meta Quest's built-in browser has great WebXR support too!
While playing a VR game on a web page might seem like a pretty weird thing to do, there are some compelling use-cases:
- Getting your games or experiences into "walled gardens" like the Meta Quest 2, where Facebook has very tight control over what gets to appear in the Meta store.
- Sharing hobbyist passion projects and game jam games. It's well known that if you make a web version of your game in a jam game, more people will try it, and the same applies to VR games.
- Supporting a wide-range of VR headsets, from the very capable (like Valve Index, HTC Vive, Oculus Rift S and Meta Quest 2) down to the less capable (like Google Cardboard, Oculus Go, GearVR).
Godot's WebXR support for AR is still pretty rudimentary, but AR is also pretty compelling: imagine browsing a furniture store's website on your smartphone, then hitting an "Enter AR" button, which allows you to see what that piece of furniture would look like in the room you're currently in.
Setting up the basics
The basics for making a VR game for WebXR in Godot, are very similar to making a game for any VR platform in Godot:
- Open "Project Settings" (click Project -> Project Settings...) go to the "XR" -> "Shaders" section, and check the "Enabled" option and then "Save & Restart".
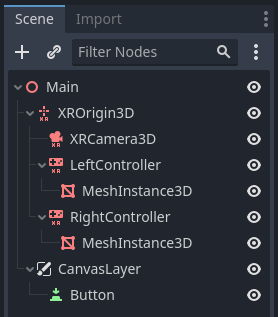
- Make a new main scene with a
Node3Dnode as the root (the default for "3D Scene"). - Add an
XROrigin3Dnode. - Add three children to the
XROrigin3Dnode: anXRCamera3Dand twoXRController3D's. - Rename the first
XRController3Dto LeftController, and set the "Tracker" property to "left_hand". - Rename the second
XRController3Dto RightController, and set the "Tracker" property to "right_hand". - Add a
MeshInstance3Dnode to each controller, and assign it a "New BoxMesh" with its dimensions set to 0.1 on each side. These cubes will stand in for your VR hands until you can replace them with something better.
Next, we need to add a one thing unique to WebXR, that you wouldn't normally use for other VR platforms:
- Add a
CanvasLayeras a child of the root node - Add a
Buttonnode to theCanvasLayer, and change its "Text" property to "Enter VR". Users will need to click this button to switch from browsing a flat web page, to an immersive VR experience.
In the end, your scene tree should look like this:
Next, attach a script to the root node (called "Main" in our scene tree image above), with the following contents:
extends Node3D
var webxr_interface
func _ready() -> void:
$CanvasLayer.visible = false
$CanvasLayer/Button.pressed.connect(self._on_button_pressed)
webxr_interface = XRServer.find_interface("WebXR")
if webxr_interface:
# WebXR uses a lot of asynchronous callbacks, so we connect to various
# signals in order to receive them.
webxr_interface.session_supported.connect(self._webxr_session_supported)
webxr_interface.session_started.connect(self._webxr_session_started)
webxr_interface.session_ended.connect(self._webxr_session_ended)
webxr_interface.session_failed.connect(self._webxr_session_failed)
webxr_interface.select.connect(self._webxr_on_select)
webxr_interface.selectstart.connect(self._webxr_on_select_start)
webxr_interface.selectend.connect(self._webxr_on_select_end)
webxr_interface.squeeze.connect(self._webxr_on_squeeze)
webxr_interface.squeezestart.connect(self._webxr_on_squeeze_start)
webxr_interface.squeezeend.connect(self._webxr_on_squeeze_end)
# This returns immediately - our _webxr_session_supported() method
# (which we connected to the "session_supported" signal above) will
# be called sometime later to let us know if it's supported or not.
webxr_interface.is_session_supported("immersive-vr")
$XROrigin3D/LeftController.button_pressed.connect(self._on_left_controller_button_pressed)
$XROrigin3D/LeftController.button_released.connect(self._on_left_controller_button_released)
func _webxr_session_supported(session_mode: String, supported: bool) -> void:
if session_mode == 'immersive-vr':
if supported:
$CanvasLayer.visible = true
else:
OS.alert("Your browser doesn't support VR")
func _on_button_pressed() -> void:
# We want an immersive VR session, as opposed to AR ('immersive-ar') or a
# simple 3DoF viewer ('viewer').
webxr_interface.session_mode = 'immersive-vr'
# 'bounded-floor' is room scale, 'local-floor' is a standing or sitting
# experience (it puts you 1.6m above the ground if you have 3DoF headset),
# whereas as 'local' puts you down at the ARVROrigin.
# This list means it'll first try to request 'bounded-floor', then
# fallback on 'local-floor' and ultimately 'local', if nothing else is
# supported.
webxr_interface.requested_reference_space_types = 'bounded-floor, local-floor, local'
# In order to use 'local-floor' or 'bounded-floor' we must also
# mark the features as required or optional.
webxr_interface.required_features = 'local-floor'
webxr_interface.optional_features = 'bounded-floor'
# This will return false if we're unable to even request the session,
# however, it can still fail asynchronously later in the process, so we
# only know if it's really succeeded or failed when our
# _webxr_session_started() or _webxr_session_failed() methods are called.
if not webxr_interface.initialize():
OS.alert("Failed to initialize WebXR")
return
func _webxr_session_started() -> void:
$CanvasLayer.visible = false
# This tells Godot to start rendering to the headset.
get_viewport().use_xr = true
# This will be the reference space type you ultimately got, out of the
# types that you requested above. This is useful if you want the game to
# work a little differently in 'bounded-floor' versus 'local-floor'.
print ("Reference space type: " + webxr_interface.reference_space_type)
func _webxr_session_ended() -> void:
$CanvasLayer.visible = true
# If the user exits immersive mode, then we tell Godot to render to the web
# page again.
get_viewport().use_xr = false
func _webxr_session_failed(message: String) -> void:
OS.alert("Failed to initialize: " + message)
func _on_left_controller_button_pressed(button: String) -> void:
print ("Button pressed: " + button)
func _on_left_controller_button_released(button: String) -> void:
print ("Button release: " + button)
func _process(_delta: float) -> void:
var thumbstick_vector: Vector2 = $XROrigin3D/LeftController.get_vector2("thumbstick")
if thumbstick_vector != Vector2.ZERO:
print ("Left thumbstick position: " + str(thumbstick_vector))
func _webxr_on_select(input_source_id: int) -> void:
print("Select: " + str(input_source_id))
var tracker: XRPositionalTracker = webxr_interface.get_input_source_tracker(input_source_id)
var xform = tracker.get_pose('default').transform
print (xform.origin)
func _webxr_on_select_start(input_source_id: int) -> void:
print("Select Start: " + str(input_source_id))
func _webxr_on_select_end(input_source_id: int) -> void:
print("Select End: " + str(input_source_id))
func _webxr_on_squeeze(input_source_id: int) -> void:
print("Squeeze: " + str(input_source_id))
func _webxr_on_squeeze_start(input_source_id: int) -> void:
print("Squeeze Start: " + str(input_source_id))
func _webxr_on_squeeze_end(input_source_id: int) -> void:
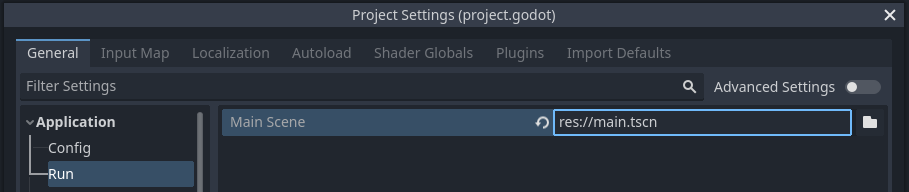
print("Squeeze End: " + str(input_source_id))And before we move on, save this scene, edit your project settings (Project -> Project Settings...) and under the Application -> Run section, set your "Main Scene" to the scene you just created:
Exporting
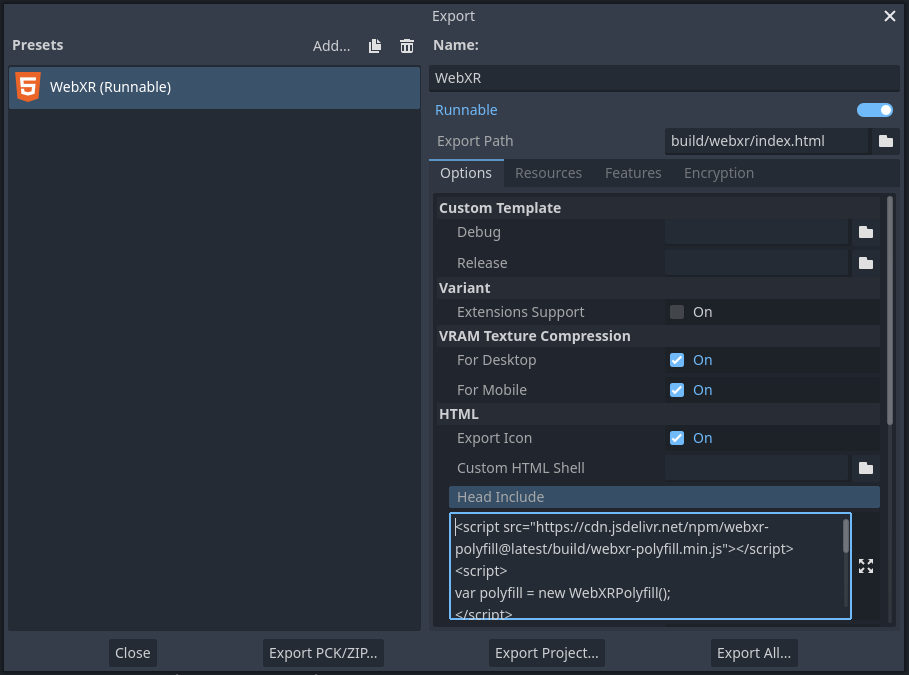
Next, we need to setup an HTML5 export:
- In the Godot editor, click Project -> Export... and then Add... -> Web
- Copy this into the "Head Include" field:
<script src="https://cdn.jsdelivr.net/npm/webxr-polyfill@latest/build/webxr-polyfill.min.js"></script>
<script>
var polyfill = new WebXRPolyfill();
</script>
<script src="https://cdn.jsdelivr.net/npm/webxr-layers-polyfill@latest/build/webxr-layers-polyfill.min.js"></script>
<script>
var layersPolyfill = new WebXRLayersPolyfill();
</script>
This adds the WebXR Polyfill and WebXR Layers Polyfill, which will fill in holes in a web browser's WebXR support, allowing your app to work on more web browsers. For some browsers this isn't needed at all, but on others, it will actually fully implement WebXR from scratch, based on top of the older WebVR technology.
The export dialog should look something like this:
Finally, click "Export Project" to export your WebXR app!
WebXR only works from HTTPS!
If you open a web page over HTTP, your web browser will refuse to support WebXR, so you need to use HTTPS. Also, Godot 4 requires specific HTTP headers for web builds.
The easiest way to fulfill both requirements, is to use the HTTP server built into Godot! First, you need to enable HTTPS, by going to Editor -> Editor Settings... and into the Export -> Web section and enable "Use TLS".
Then, to start the HTTP server, click the "Remote Debug" button in the upper-left corner, and select "Run in Browser":

(If it gives a warning about the site being "unsafe", click the "advanced" or "details" button, and the link to proceed anyway.)
This will work great if you have a PCVR headset connected to your computer, or if you're just testing with the WebXR emulator (more information about that below!).
However, if you want to run it on a standalone headset like the Meta Quest 2, you'll need to go back to Editor -> Editor Settings... and the Export -> Web section and change the "HTTP Host" from "localhost" to your IP on the LAN, and restart Godot's HTTP server.
So long as your standalone headset is connected to the same LAN, then you can open up the same URL as Godot opens up in the local web browser (for example, https://192.168.0.2:8060/tmp_js_export.html), in the browser on your headset.
Debugging on the Desktop
If you have a PCVR headset, debugging is easy, because you're using a desktop browser like Chrome or Firefox. To see any messages from your app (the sort you usually see in the "Output" tab in the Godot editor, or in the terminal), you just need to open the web developer console in your browser, which can be done in both Firefox and Chrome by pressing Ctrl+Shift+I.
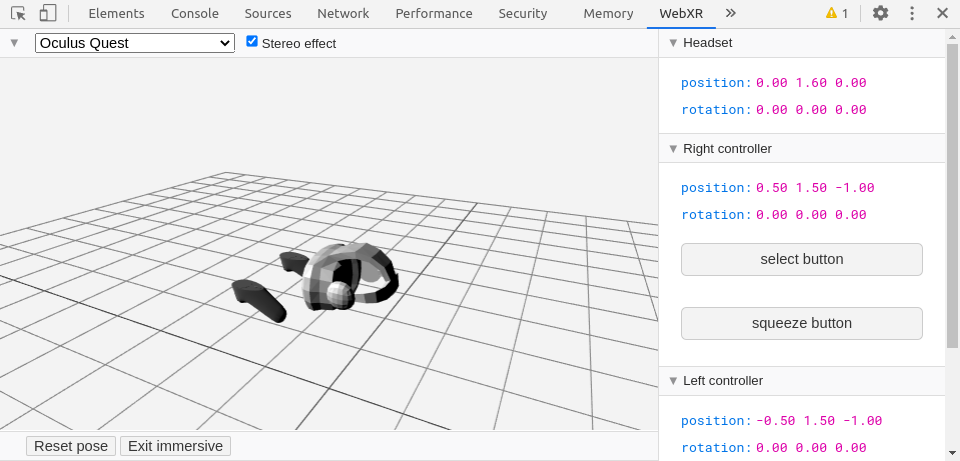
However, it can be a pain to put your headset on and off. Or, maybe you don't have a PCVR headset at all. For those cases, there's a WebXR Emulator Extension for both Chrome and Firefox.
(Note: there is a new, experimental WebXR emulator from Meta that you can find here. It is much more modern and capable than the current stable emulator.)
It gives you a new WebXR tab in the web developer console, that lets you move around the headset and controllers, as well as trigger some controller events, to make sure your app responds correctly.
Debugging on the Meta Quest 2
If you're testing in the Meta Browser on the Quest, unfortunately, there isn't a web developer console that you can access in your headset.
Luckily, however, the Meta Browser is based on Chrome, and Chrome has the ability to remotely debug another instance of Chrome.
For the full instructions, see this article on the Meta Quest Developers website. Warning: You'll need to install some Android developer tools on your system for it to work.
But once you're all setup, the short version is:
- Connect your Quest to your computer with a USB cable
- Open Chrome on your desktop
- Go to chrome://inspect#devices
- Click the "Inspect" link by the browser session that has your app running in it
This will give you the web developer console you're used to on the desktop, but connected to the Meta Browser!
Handling input
Detecting button presses on the controllers is done in much the same way as on any other VR platform.
You can connect to the button_pressed and button_released signals on XRController3D, for example:
func _ready() -> void:
  # ... previous code ...

  $XROrigin3D/LeftController.button_pressed.connect(self._on_left_controller_button_pressed)
  $XROrigin3D/LeftController.button_released.connect(self._on_left_controller_button_released)

func _on_left_controller_button_pressed(button: String) -> void:
  print ("Button pressed: " + button)

func _on_left_controller_button_released(button: String) -> void:
  print ("Button release: " + button)
Here's all the button ids:
| Button | Pressed/released Id | Pressure Id |
|---|---|---|
| Trigger | trigger_click | trigger |
| Grip | grip_click | grip |
| Touchpad Press | touchpad_click | touchpad_click_pressure |
| Touchpad Press | touchpad_click | touchpad_click_pressure |
| Thumbstick Press | thumbstick_click | thumbstick_click_pressure |
| A/X button | ax_button | ax_button_pressure |
| B/Y button | by_button | by_button_pressure |
You can get the pressure (a value from 0.0 to 1.0 for how far the button is pressed) by doing:
var trigger_pressure := $XROrigin3D/LeftController.get_float("trigger")Detecting thumbstick and touchpad movement is also quite straight-forward:
func _process(_delta: float) -> void:
  var thumbstick_vector: Vector2 = $XROrigin3D/LeftController.get_vector2("thumbstick")
  if thumbstick_vector != Vector2.ZERO:
    print ("Left thumbstick position: " + str(thumbstick_vector))
The two possible Vector2 ids are "thumbstick" or "touchpad".
Select and Squeeze events
WebXR also provides an alternate way of handling input, that will work even for devices that don't support VR controllers (ex. Google Cardboard) via a set of special 'select' and 'squeeze' events.
Here's an example of how you'd use them:
func _ready() -> void:
  # ... previous code ...

  if webxr_interface:
    webxr_interface.select.connect(self._webxr_on_select)
    webxr_interface.selectstart.connect(self._webxr_on_select_start)
    webxr_interface.selectend.connect(self._webxr_on_select_end)

    webxr_interface.squeeze.connect(self._webxr_on_squeeze)
    webxr_interface.squeezestart.connect(self._webxr_on_squeeze_start)
    webxr_interface.squeezeend.connect(self._webxr_on_squeeze_end)

func _webxr_on_select(input_source_id: int) -> void:
  print("Select: " + str(input_source_id))

  var tracker: XRPositionalTracker = webxr_interface.get_input_source_tracker(input_source_id)
  var xform = tracker.get_pose('default').transform
  print (xform.origin)

func _webxr_on_select_start(input_source_id: int) -> void:
  print("Select Start: " + str(input_source_id))

func _webxr_on_select_end(input_source_id: int) -> void:
  print("Select End: " + str(input_source_id))

func _webxr_on_squeeze(input_source_id: int) -> void:
  print("Squeeze: " + str(input_source_id))

func _webxr_on_squeeze_start(input_source_id: int) -> void:
  print("Squeeze Start: " + str(input_source_id))

func _webxr_on_squeeze_end(input_source_id: int) -> void:
  print("Squeeze End: " + str(input_source_id))
The select* signals are emitted when the a "primary action" is done, and the squeeze signals are emitted for a "primary squeeze action". What those actions are depends on the device. For a Meta Quest, those actions are pressing the trigger and grip buttons on the Oculus Touch controllers, but for less capable devices, it could be tapping the screen, even speaking a voice command.
The 'input_source_id' passed to each of signals identifies an XRPositionalTracker object with position and orientation information, as shown in the example above. If the device has a left and right touch controller, those will always have ids of 0 and 1 - any other type of input will have a higher id number (even on devices without a left or right controller).
In the case of non-traditional input sources, the position and orientation should be interpreted as a ray pointing at the object the user wishes to interact with.
A work-in-progress demo
I've been working on a WebXR prototype where you can walk around and shoot flying enemies:
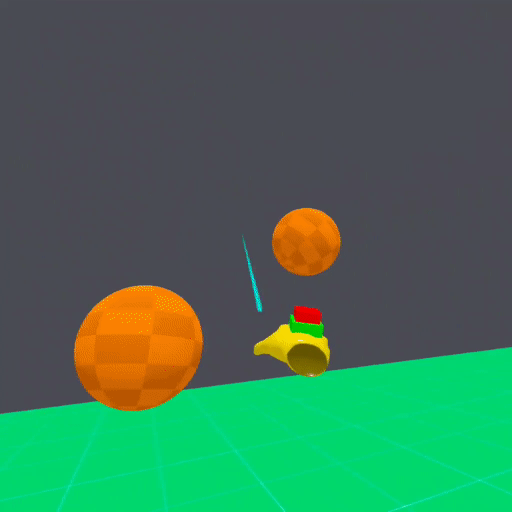
Here's the URL:
https://bit.ly/sgproto-2301-01
If you have an Meta Quest, you can open that up in the Meta Browser on your headset. Or, if you have a PCVR headset, connect it to your computer and visit that URL with the latest version of Chrome or Firefox.
(PS: the demo was built from Godot 4.0-beta10, so contains a number bugs -- including crashes! -- that you would expect from the beta release of a game engine, which don't necessarily reflect the stability of WebXR support.)
Give it a try and let me know!
If you try to make something with WebXR in Godot, please let me know how it goes!
If everything works, I'd love to see what you make. Or, if things go wrong and you need some help, I'd love to collect your bug reports and get ideas for improving the documentation.
Happy Hacking! :-)